Posts Tagged With: project-based homeschooling

Family “Quote of the Week” Rocks!

“You have brains in your head. You have feet in your shoes. You can steer yourself in any direction you choose. You’re on your own. And you know what you know. And YOU are the one who’ll decide where to go…” ~ Dr. Seuss, Oh The Places You’ll Go!

Here’s a great family activity for sharing around the dinner table. Every Sunday we choose a quote-of-the-week to share throughout the week, and it is really fun!

I originally got the idea from the Mensa website and printed their page of quotes from the teacher resources. We have used some of their ideas, but also have found many on our own. We each participate by coming up with quotes, and some of our family send favorites to us as well. It is such a simple idea, but so fruitful in its results. Some very interesting conversations have arisen from these quotes! Friends, internet searches of famous quotes, and books are wonderful resources for finding appropriate material to draw from.

We write our weekly quote onto a 3×5 recipe card and keep it on our table. We seem to end up talking about these quotes, and learning things about some of the people who said them. Sometimes we write questions or little bits of information on the backs of the cards, as well as the date. This is a very enriching, ongoing, free activity for almost any age. I think teenagers would like it as well as little ones and adults. And, for those who feel that really little kids wouldn’t benefit from this activity, I strongly disagree! It is not important for kids to understand exactly what every intelligent quote means. Just being a part of family discussion and interaction is incredibly stimulating!

We started Family QOTW back in September and it is still rolling strong in our household. Here are some examples from the past months:

“Do what you feel in your heart to be right- for you’ll be criticized anyway.” ~Eleanor Roosevelt

“Be bold and mighty forces will come to your aid.” ~Basil King

“Be yourself; everyone else is already taken.” ~Oscar Wilde

“A life spent making mistakes is not only honorable, but more useful than a life spent doing nothing” ~George Bernard Shaw (thanks for that one Grandma!)

“It’s not whether you get knocked down; it’s whether you get up.” ~Vince Lombardi

As Captain has suggested, it will be fun to look back at this collection of quotes one day. I agree! Thanks for reading and good thoughts to all.

Carpe Diem! Karen

Categories: Family fun, Homeschooling Projects, Language Arts Rock For Kids! | Tags: , , , , , , , , , | 12 Comments

Be Your Child’s Scribe So They Are FREE to Create!

IMG_2824

Standing on the back of the couch, wiggling around with her little dog, Captain creates a poem

But she is not writing. She is not fiddling with papers and pencil, stopping to ask how to spell a word, or having concern for getting her thoughts down on paper. She is free to muse, to talk, to connect with what she is feeling, to throw her head back and laugh and bounce with happiness when she is pleased with herself. I am her mom, and I am her scribe.

I have addressed this concept in other posts, but wanted to take a moment to dive in a bit more deeply, as it is something that feels very important to me. Elementary-aged kids do a lot of writing. They are encouraged, cajoled, prompted and sometimes pressured to keep up with writing practice. This is a wonderful, yet difficult, stage for many kids as it is all about practice, hand control and just getting used to getting things down on paper. They are learning to spell new words constantly and even the best writers of the bunch need a little break sometimes, I feel. It wasn’t long ago that I realized that my kiddo was getting plenty of writing practice with other things, so I decided to ask her if she would like me to write for her when she created a story. It was amazing! Letting her loose to just create and go wild with a story or a poem is fantastic, and what comes out is so pure and full of energy and creativity. Think about if you felt inspired to come up with a story, whether on your own, or prompted for a school project, and you couldn’t get the words down easily. What you were thinking was coming in a flow of words and ideas, but you just couldn’t write them down, couldn’t spell the words or get past the paper in front of you. It wouldn’t be very nurturing of the creative process. In fact, I think I would probably put the pencil down and move on. What if someone recorded it for you? Pure freedom to ramble. How wonderful!!

I am sharing this because I have experienced, with my 6-year-old daughter, how beneficial it can be. I will be her note-taker sometimes and we both enjoy the process immensely. In fact today we are continuing our study of pineapples (the things I am learning about because Captain is interested!) and this afternoon, when she comes up with her “Pineapple Poem”, I will be her scribe. She loves it and trust me, I can’t wait!

Thank you for reading here. I welcome any comments or conversation about how much writing kids do, creative writing or anything else. In the meantime, I truly hope that kids get as many opportunities to let themselves be free to wander creatively, with someone who loves them willing to write it all down.

Good thoughts, juicy pineapples, and a freshly sharpened pencil to all,

Karen

Categories: Homeschooling Projects | Tags: , , , , , , , | 24 Comments

Kids Art Lesson: Sketching, Photography, Ansel Adams Biography & Connecting With Nature

IMG_8244

View of the Sierras, photograph taken by M, age 7

Grab some sketch pads & pencils, a camera, and the following information about photographer Ansel Adams, find a nice spot in nature, and you have a wonderful art lesson to share with kids!

The beauty of nature has been an inspiration to artists for all of time. I would like to share how I presented the works of Ansel Adams, and also touched briefly on Claude Monet, while taking the kids out to sketch in the mountains. All you need is a place in nature (mountains, parks, fields, and even your own backyard ), sketch pads, pencils, a camera, and some artist information and examples.

Captain’s friends came for a fun visit this week and we went on a hike in Sequoia Forest. I told them a little bit about how artists of many mediums have been inspired by nature, and that today we would be talking about the famous photographer Ansel Adams. We talked about his life and looked at photographs (see information below) and also talked about Claude Monet’s work. They learned  the term “impressionism” and its origin. I gave each kid a sketch pad and invited them to find a spot to sit with a nice view to sketch. We talked about perspective, lines and details, and then they went to work. The sketches were amazing! The kids took their sketches home to watercolor, and Captain painted hers right away that evening. I showed them a postcard book of Adam’s lovely winter landscapes and after they “oohed and ahhed” over their favorites, I gave them the opportunity to take 3 photographs each, with my iphone, encouraging them to take their time. They each chose their favorite photo and I promised to print their special photo in black and white and frame them. They were thrilled. *Note: I printed the photos at Costco for 13 cents each, and bought black frames at a dollar store. I can’t wait to give the kids their own photographic works of art this week!

IMG_8247

Beautiful Granite, photograph taken by Captain, age 6

IMG_8252

Bueller in the Mountains, photograph taken by J, age 5

IMG_8242

M with his mountain sketch.  He really loved the whole experience of sketching and photographing an amazing view of the Sierras from atop a giant, granite rock face.

image

Captain’s watercolored sketch of granite and mountains.

Here is some wonderful, easy to understand information about Ansel Adams to share with your kids. I found these facts on a wonderful site called Mr. Nussbaum! Learning + FunClick on the link to easily print these biography pages, and also check out some of the cool science and other learning ideas and lessons presented there!

Ansel Adams Biography for Kids

Glacier National Park

Early Life

Ansel Adams was a famous American photographer and environmentalist. He was born near the Golden Gate Bridge in San Francisco, California, on Feb. 20, 1902. When he was four years old, his nose was broken when he was knocked to the ground by an aftershock of the great earthquake. His nose was crooked for the rest of his life. One of his earliest memories was seeing smoke from the great fire that followed the earthquake.

Growing Up

He was an only child who performed poorly at school, so his parents had him tutored at home. Although he was hyperactive and possibly dyslexic, he was thought to possess an eidetic memory, which is a form of photographic memory that includes memories of smells, sounds, and other senses. Ansel enjoyed music and taught himself to play the piano when he was twelve. He also enjoyed nature and loved walking in the sand dunes near his home. His father gave him a telescope, and they shared a great interest in astronomy.

A Photographer is Born in Yosemite National Park

When he was fourteen, Ansel read In the Heart of the Sierras by James Mason Hutchings, and he convinced his parents to take a vacation in Yosemite National Park. His parents gave him a Kodak Brownie camera for the trip, and Ansel’s interest in photography was born as he tramped through the park’s mountains. When he talked about the trip, Ansel said, “the splendor of Yosemite burst upon us and it was glorious… One wonder after another descended upon us… There was light everywhere… A new era began for me.” Some of his most famous photographs were of Yosemite. His work helped raise awareness of and interest in America’s national parks. In 1927, Ansel took one of his best known photos, “Monolith, the Face of Half Dome” at Yosemite.

Grand Teton Mountains and Snake River

The Sierra Club

When he was seventeen, Ansel joined the Sierra Club. The club works to preserve the earth’s natural wonders and resources. He spent four summers as the caretaker of the Sierra Club visitor center in Yosemite Valley, and was an active member of the club for the rest of his life. Ansel was interested in environmental issues related to national parks, especially Yosemite, and the preservation of wilderness.

Photography as an Art

Ansel learned basic darkroom technique working part-time for a photo finisher in San Francisco. In 1927, Albert Bender, a businessman and patron of the arts, helped publish Ansel’s first portfolio, Parmelian Prints of the High Sierras. Ansel soon got paid for photos, and he began to think about a career as a photographer instead of a pianist. In 1933 he opened his own art and photography gallery in San Francisco. He often worked for eighteen or more hours a day, for days and weeks on end. He learned from and exhibited with other famous photographers of the time including Alfred Stieglitz, Imogen Cunningham, Paul Strand, and Edward Weston. They developed photography as a form of art. Ansel helped to establish the first department of photography at a museum at the Museum of Modern Art in New York.

Sierra Nevada Mountains

Ansel’s Work in Space

Ansel Adams’ photographs recorded what many of the National Parks were like before tourism. His photograph of the Grand Tetons and the Snake River was one of 115 images chosen to grace the Voyager spacecraft in an effort to share information about life on Earth with a possible alien civilization. He died on April 22, 1984 in Monterey, California.

image

No matter how I photographed these lovely works, I couldn’t help but get glare off the glass. Funny how it made the cloudy, gray sky look blue in M’s photo!

Thank you so much for reading. I wish you a glorious, dramatic, black and white day, filled with color!

Good thoughts, Karen

Categories: Art Rocks For Kids!, Family fun, Homeschooling Projects, Sequoia National Forest & Park | Tags: , , , , , , , , , , , | 24 Comments

Make A Ming-Inspired Bowl!

IMG_8121

These sweet bowls would make lovely Christmas gifts for family & friends!

We’ve been studying the beginnings of Ancient China and highly recommend this straight-up fun project for all ages. If needed, parents can help younger kids in between making a Ming bowl for themselves!

You’ll Need: A large ball of air-dry clay (I have some of the Crayola brand, and it works great, and is affordable at about $5 for a tub), plastic wrap, a small round bowl, a rolling pin, a sculpting tool or blunt knife, acrylic paints, a clear acrylic sealing spray, or a mixture of glue and water, to glaze the finished piece.

1. Wrap the outside of your bowl in plastic wrap.  I recommend using a smaller “condiment” sized bowl for the first one.

2. Roll out your ball of clay to no less than 1/4″ thickness, making sure it is big enough to cover the outside of the bowl. Press it tightly around the bowl, then use your tools to trim away any excess. Be sure not to make the air-dry clay too thin or the bowl will crack when it dries (we did this and then used the pieces as “archaeology pottery” 🙂 )

3. Place the bowl on a piece of newspaper and allow to dry in an airy place. Don’t put it in the direct sun or it can dry out too fast and crack. It should be dry by the next morning.

4. Remove the dried bowl from the form and paint! Ancient Chinese pottery was usually decorated with pictures of birds, flowers, and outdoor scenes, painted in whites and blues. Captain painted hers with cobalt blue, let it dry, then painted flowers and bird shapes in moon yellow. She was a little bummed that her birds didn’t come out the way she wanted, but they are fabulous! She even added a little tiny “M” for “mom” in the center of one of her flowers… ahhh!

IMG_8081

5. After the piece is completely dry, a fine sharpie can be used to write a name, or initials, and date on the bottom. What a sweet keepsake!

6. Spray with clear acrylic sealer (adults only), or you can glaze it with a mixture of 2 parts white glue to 1 part water. These both will give it a shiny glaze coating, which we love. Or, you can leave it as is.

IMG_8114IMG_8117

Before and after I sprayed the acrylic seal on

Fun, simple and a little “M” to boot. I love it!  I hope you and/or your kids will give this a try. Check out Google images to share some traditional Ming bowls and pottery with your kids. Captain has been inspired to try making another one that looks like this:

Unknown

A gorgeous flower bowl from the 1300’s

We got the idea for this project out of The Story of the World: History for the Classical Child, Ancient Times. We thank you kindly!

Cheers, Karen

Categories: Art Rocks For Kids!, Family fun, Homeschooling Projects, Social Science Rocks For Kids! | Tags: , , , , , , , , , , , , , , | 4 Comments

Make a Lung Model out of a Plastic Bottle, Straws & Balloons!

IMG_7813

It’s funny how this thing has become a toy to her. This morning she was in her room explaining the respiratory system to Scooby Doo and the Gang!


It’s anatomy time, and the human body unit is in full swing at The Cabin. In learning about the respiratory system, we created a simple lung model that has been a hit in our household. I doubt Captain will ever forget how this system works!

You’ll Need: A plastic 2 liter bottle cut in half, two straws, two balloons, masking tape (or black electrical tape as that is what we had around and it worked great!) a rubber band and a piece of plastic bag.

* As you are creating this model with your kids, be sure to use the proper terminology. Explain that you’ll be making a model of the lungs to show how the respiratory system works. Let them know that the plastic bottle represents the rib cage, the straws represent the trachea/bronchi, the balloons represent the lungs and the plastic bag represents the diaphragm. While assembling, use only the anatomical names! For example: “Can you hold the ribcage while I slide the trachea and lungs in?”

Step 1: Put a straw down into a balloon, almost to the bottom. Securely tape the top of the balloon to the straw so that it is air tight. Go around with the tape a few times to be sure it is sealed. Do the same to the second balloon and then secure the two straws together with more tape.

Step 2: Put the straws down into the bottle top and tape around and around the rest of the bottle-opening to be sure that it is air-tight. If air gets in, the model won’t work.

Step 3: Place the bottle onto a piece of plastic bag and use a rubber band to secure it tight to the bottom. Trim off the excess bag, if needed.

Step 4: It is helpful to tape a little piece of paper, or a string, to the bottom of the diaphragm to pull it up and down.

That’s it! Now the child can pull the diaphragm up and down and see the lungs expand and contract! In the human body, the trachea goes down and splits into the two bronchial tubes that go into the lungs. We weren’t able to show this extra step in our model, but we looked at pictures and learned how it works. Here is a good explanation to share with your kids, if you don’t have other learning materials handy:

“Your body needs air to live! Air is a mixture of many things, but the oxygen in air is what your body needs most. Oxygen is a gas that your body combines with the food you have eaten to make energy. When you inhale, or breathe in, air goes in your nose or mouth, down a cool tube called a trachea and into your 2 lungs. Your lungs are big bags made of a bunch of tiny bags that fill with air.Oxygen from the air goes into the blood and carbon dioxide, a waste your body makes, comes from your blood and goes into the air sacs. When you breathe out, the carbon dioxide leaves your body. Ya-hoo!”

You take about 20,000 breaths a day and sneeze at about 100 miles per hour! Lungs weigh about 1 pound each and adult lungs are each about the size of a football! Your right lung has 3 regions, or lobes, while your left lung has two lobes and each lobe has its own blood supply. That way, if one part is damaged, the other 4 keep working! How cool is that?

IMG_7812

One more note: It is very beneficial to have kids draw a picture of what they learned, coloring the balloons, straws, etc. Help them label the simple parts.

The human body is amazing! Happy breathing into all of those lovely lobes!

Cheers, Karen

Categories: Homeschooling Projects, Science Rocks For Kids! | Tags: , , , , , , , , , , , , , , | 12 Comments

Bringing Circle Time to the Homeschool

IMG_7807

I can’t believe we waited so long to do this!

Have you ever tried starting your day with circle-time? I am astounded by what has developed into a much-needed routine for my daughter and I. I always thought of “circle-time” as being something a lot of kids would do together: sitting on the floor, talking about feelings, or hearing a story. Honestly, I thought we would need, well, more people, to do one of our own. I was wrong. Our homeschool mainly consists of my daughter and I, working through projects, learning new things together, and attending wonderful enrichment classes twice each week at a lovely charter school. I was inspired to implement circle time into our routine when my friend told me about how the kids start their day at an outdoor-based enrichment program in Atascadero, CA. Wham! I realized with a powerful instinct that we needed to try this too. Thank you dear Annabell!

Last week I asked Captain if she would like to come with me to find a place to sit outside, under a tree, for circle time before we started our busy day. She grabbed my hand and said “let’s go!” We sat down and shared things that we are grateful for. It is wonderful. Not only do we talk about the good things in our lives, we are remembering to give thanks for the simple things, and that is priceless! We tell stories to each other, and it is a time for her to feel safe about addressing things with me, or talking about things that might be bothering her. For example, I found out that she would really rather do math earlier in the day, and that she doesn’t like for me to comment on her paintings until she is completely finished with a session. She expressed her concern for wild horses, and her gratefulness that kids can be adopted by new parents if the parents are unable to care for them. Wow. She wanted to hear detailed stories of her birth, about the time when the puppies were born, and tell me all about how amazing ants are. I find that after we are finished, we are both ready for our day. She is calmer and more receptive to some of the things she needs to do that aren’t her favorites. I love how it has changed the start of our days!!!!

Remembering to be thankful, expressing feelings, and getting some body-earthing in at the same time is a beautiful thing. If you homeschool, or not, do you have circle-time as a part of your morning routine? Would you be willing to give it a go? Does it seem silly or unimportant? I welcome you to write in, please! I would love to keep an open discussion going and hear any thoughts or ideas.

Luscious round thoughts to all!

Karen

Categories: Family fun, Homeschooling Projects, Positive Parenting, Relationships | Tags: , , , , , , , , , , , , , , | 19 Comments

Writing Practice, Art & Imagination: Create Your Own Superhero!

photo-4

Princess Halina, Animal Rescuer, has super-powers, a secret cabin, blue hair and her motto is: “Be yourself: everyone else is already taken”…

Here is a simple way to get the imagination rolling, get some writing practice done, and draw and color/paint your very own special superhero. I was surprised at how Captain reacted to this simple prompt: “Create a superhero character. Draw, label, or write about what powers that person has, or can do.” Basically, she thought about it for about a minute before she started spewing out a list of exciting possibilities. I sat on the opposite side of the counter from her, with a paper and pencil ready, and made notes as quickly as possible. She really enjoyed that I was “her assistant note-taker” and felt free to just brainstorm. It was really fun! Afterward, she sketched her character in pencil and then colored her in with markers. She wanted to copy the notes in pen, as she was sure she wouldn’t need to erase a single thing. She was right! We did this activity a couple of days ago, and she is still talking about it and adding to the story. Princess Halina, Animal Rescuer, seems to have empowered her creator and I can’t wait to see where it goes! *On a side note, I believe that an adult offering to just be an “assistant” or “note-taker” for early writers is very valuable. They feel special, and the freedom to just go with their ideas without having to fiddle with handwriting is priceless!

Here is part one of Captain’s Superhero Description:

“My Superhero, Princess Halina, is a girl who saves animals. She wears a yellow dress and crown, and sometimes a yellow cape. Her super powers are to read minds (but only when wearing her yellow cape, dress and crown), shoot lights out of her fingers (to blow things up), and she can make a light so bright that nobody can see except her, when she is wearing her goggles (which magically appear). She also has another secret, secret power that nobody knows about yet…

Princess Halina has a secret cabin where she can hide animals when she’s helping them, and to keep them safe from creepy people who want to steal them. She needs a lot of powers to defeat the bad guys. Ten people have already told Princess Halina “Be yourself: everyone else is already taken” and she really knows it!”

I also feel that creating a superhero can help kids work out some of their fears about things like “bad guys” and “creepy people”. Incidentally, the quote above is from Oscar Wilde and was our family “quote of the week” last week. It was sweet that she incorporated it into her creation.

This one gets a gold star for simplicity and fun. I hope you’ll try it with your own kids, and we would love to hear about it here on Kartwheels.

Powerful, blue-haired thoughts to all,

Karen

Categories: Art Rocks For Kids!, Family fun, Homeschooling Projects | Tags: , , , , , , , , , , , , | 14 Comments

Create Your Own Egyptian Hieroglyphic Tablets!

IMG_7544

Who wouldn’t WANT to make their own hieroglyphic tablets out of sand dough?

Ancient Egypt has been rocking our household all summer long, and making sand dough hieroglyphs is full of gritty fun! Hieroglyphs are fascinating for kids, and I think this project would be terrific whether or not kids are studying ancient Egypt. Even for very young kids, I feel that this project is really beneficial because it is fun, and kids seem to have a natural fascination with Egyptian symbols. Basically, a simple sand dough is mixed up and pressed out into 1/2″ “tablets”, symbols are pressed into it, the dough dries and can then be sprayed with clear acrylic, or coated with Mod Podge. Kids can do as much of the measuring and mixing as they like with this project!

* This is one of those instances where I feel that just being exposed to the idea of ancient cultures, picture languages and sticky, gritty dough to play with is enough to stimulate even very young children. It is NOT important if they learn all the specifics of the history and social-science of Egypt! Just brushing up against these ideas and letting whatever crumbs (quite literally!) fall where they may is a wonderful thing.

IMG_7520

You’ll need: Two bowls, mixing spoon, 2 1/2 – 3 cups sand, 2 cups flour, 2 tablespoons white glue, measuring cups, rolling-pin, a dash of dark red, or sand-colored acrylic or tempera paint (optional) and clear acrylic spray or Mod Podge, parchment paper, baking sheet, clay tools or spoon, chopstick, toothpick etc. It is helpful to have a book about hieroglyphs to look at and hieroglyphic stencils. *I recommend the book Hieroglyphs by Joyce Milton, illustrated by Charles Micucci. It is simple and vibrant and includes a plastic stencil sheet too! It sells for $6.29 on Amazon. I found the recipe for the sand dough at a wonderful children’s art and craft site called firstpalette.com.

IMG_7523

Step 1: Measure 2 cups flour into large bowl stir in 3/4 cup of water and mix into a soft and sticky dough. Add 2 cups sand and mush it all together. Add glue and a small squirt of dark red paint (optional) and mix together. Dump out onto countertop and 1 cup of sand (as needed) to make a thick dough. Using rolling-pin, roll out dough onto lightly sandy counter until about 1/2″ thick.

IMG_7525

Step 2: Using stencil, clay tools, toothpicks etc. Press symbols deeply into the dough.

IMG_7529

We had a lot of dough and Captain used the last “tablet” to make a hand print for Grandma!

Step 3: Place tablets onto baking sheet that is lined with parchment paper or waxed paper. Be very careful when transferring them to the sheet so that they don’t crack. If you live in a low humidity area, you can let them dry out slowly over a few days, turning once in a while. Or, put them in a low oven for about 5-10 minutes to help start the drying process.

Keep an eye on your hieroglyphs. We had a little trouble with the drying of Captain’s hieroglyphs and two of them cracked. Captain’s reaction was terrific. She exclaimed “They look more real now!” 🙂 I love the spirit in her!

This project is very fun and we ended up talking a lot about The Rosetta Stone and Ancient Egypt. I hope you try these too, they are fun!

Here’s to getting messy and vacuuming up sand…

Cheers! Karen

Categories: History Rocks For Kids!, Homeschooling Projects | Tags: , , , , , , , , , , , , , | 18 Comments

Budding Egyptologists: Make Your Own Canopic Jar!

IMG_7269

Greetings! This is a straight-up wonderful project for kids and adults alike. Captain made her very own canopic jar as part of an extensive study of ancient Egypt, and it has turned out to be a wonderful art piece, not to mention a terrific keepsake of this lovely period in her life.  I HIGHLY RECOMMEND THIS ONE! These jars are made from a condiment squeeze bottle (like ketchup!), wadded-up paper towels, masking tape, pre-plastered gauze rolls (I used the leftovers from a belly-cast I did while I was pregnant), Crayola air-dry clay, and paint.  Kids could also create an entirely different style of jar using this method, without an Egyptian theme, if desired, and the possibilities are creatively endless!

In the time of Ancient Egypt, canopic jars were used to store particular organs of the body during the mummification process, and were placed in the tomb along with the sarcophagus containing the prepared body. The jars had lids, or stoppers, that were shaped as the heads of the minor funerary deities known as the Four Sons of Horus. It was the job of these deities to protect the internal organs of the dead. Ancient Egyptians firmly believed that the deceased required his or her organs to be reborn in the Afterlife. The organs needed to be removed from the body so that it would not decay, but needed to be present with the body, so the jars were used for their storage. They were made of natural materials such as limestone, wood, pottery, alabaster or calcite. There were 4 jars used. The deity Hapy, the baboon, was for the lungs, the human-headed Imsety guarded the liver, Jackal-headed Duamutef held the stomach and the falcon-headed Qubehseneuf took care of the intestines. Fascinating! Captain chose Duamutef for her jar and created a wonderful jackal-head out of simple air-dry clay right onto the squeeze bottle top!

When Captain decided she wanted make her own jar, I found the instructions for this project at Detroit Institute of Arts Lesson Plans for Teachers. Here are the supplies you will need:

IMG_0510

One plastic squeeze jar or bottle with a top (preferably a pointed top as shown above, because it provides an armature for holding the clay head tightly in place and makes it much sturdier), pre-plastered gauze rolls, self-hardening modeling material, like Crayola’s brand, masking tape, paper towels or newspaper, acrylic or tempera paint, paint brushes.

IMG_0511

Step One is simple and fun. Use wadded up paper towels and masking tape to create a canopic jar “shape”.  I pulled a bunch of strips of tape off and had them ready for her and helped her to hold the paper towel wads onto the jar as she taped.  She stopped when she got to the shape she desired. Leave the top of the squeeze bottle in place while creating the body of the jar, including applying the plaster strips.
IMG_0513

Step Two: I pre-cut the plaster gauze rolls into strips and had a bowl of water on hand. Dip each strip quickly into the water and apply to the jar to cover completely in overlapping layers. Cover the bottom first and work up from there, covering the entire jar and smoothing it all down as you go. Do NOT cover the jar tops, as the heads will be formed later with clay, after the body of the jar has dried.IMG_0514

While the jar then dries for a day or so before painting, the top can be removed to start working on creating the head!

IMG_0516

Step Three: If it has not already been decided, the child should choose which of the 4 deities they would like to make. Captain chose Duamutef, the jackal-headed god, and there were lots of gooey comments about the stomach that would have gone into this one 🙂 I basically gave her a smooth ball of air-dry clay, she flattened the bottom, and I helped her press the lid into it. Again, the pointed tip provides an excellent armature for making a solid head.

IMG_0517

Using clay tools, or anything you have on hand like toothpicks, knives etc., help guide your child in carving out the basic shape of the desired head. I explained that she would need to remove clay from under the “chin” and extend the nose to get the jackal face that she wanted, and she did an awesome job shaping the clay. I helped a little bit here and there. I showed her how to add the ears before adding the final details to the face. I got out some toothpicks and after she shaped the ears, I showed her how to use a toothpick to secure the ears to the head and then use her fingers to carefully sooth the clay down to help secure the ears in place. The jackal is the only one that has ear “extensions” like this, and we really wanted to make them sturdy! The air-dry clay was very thick and took a few days to dry outside.

IMG_0520

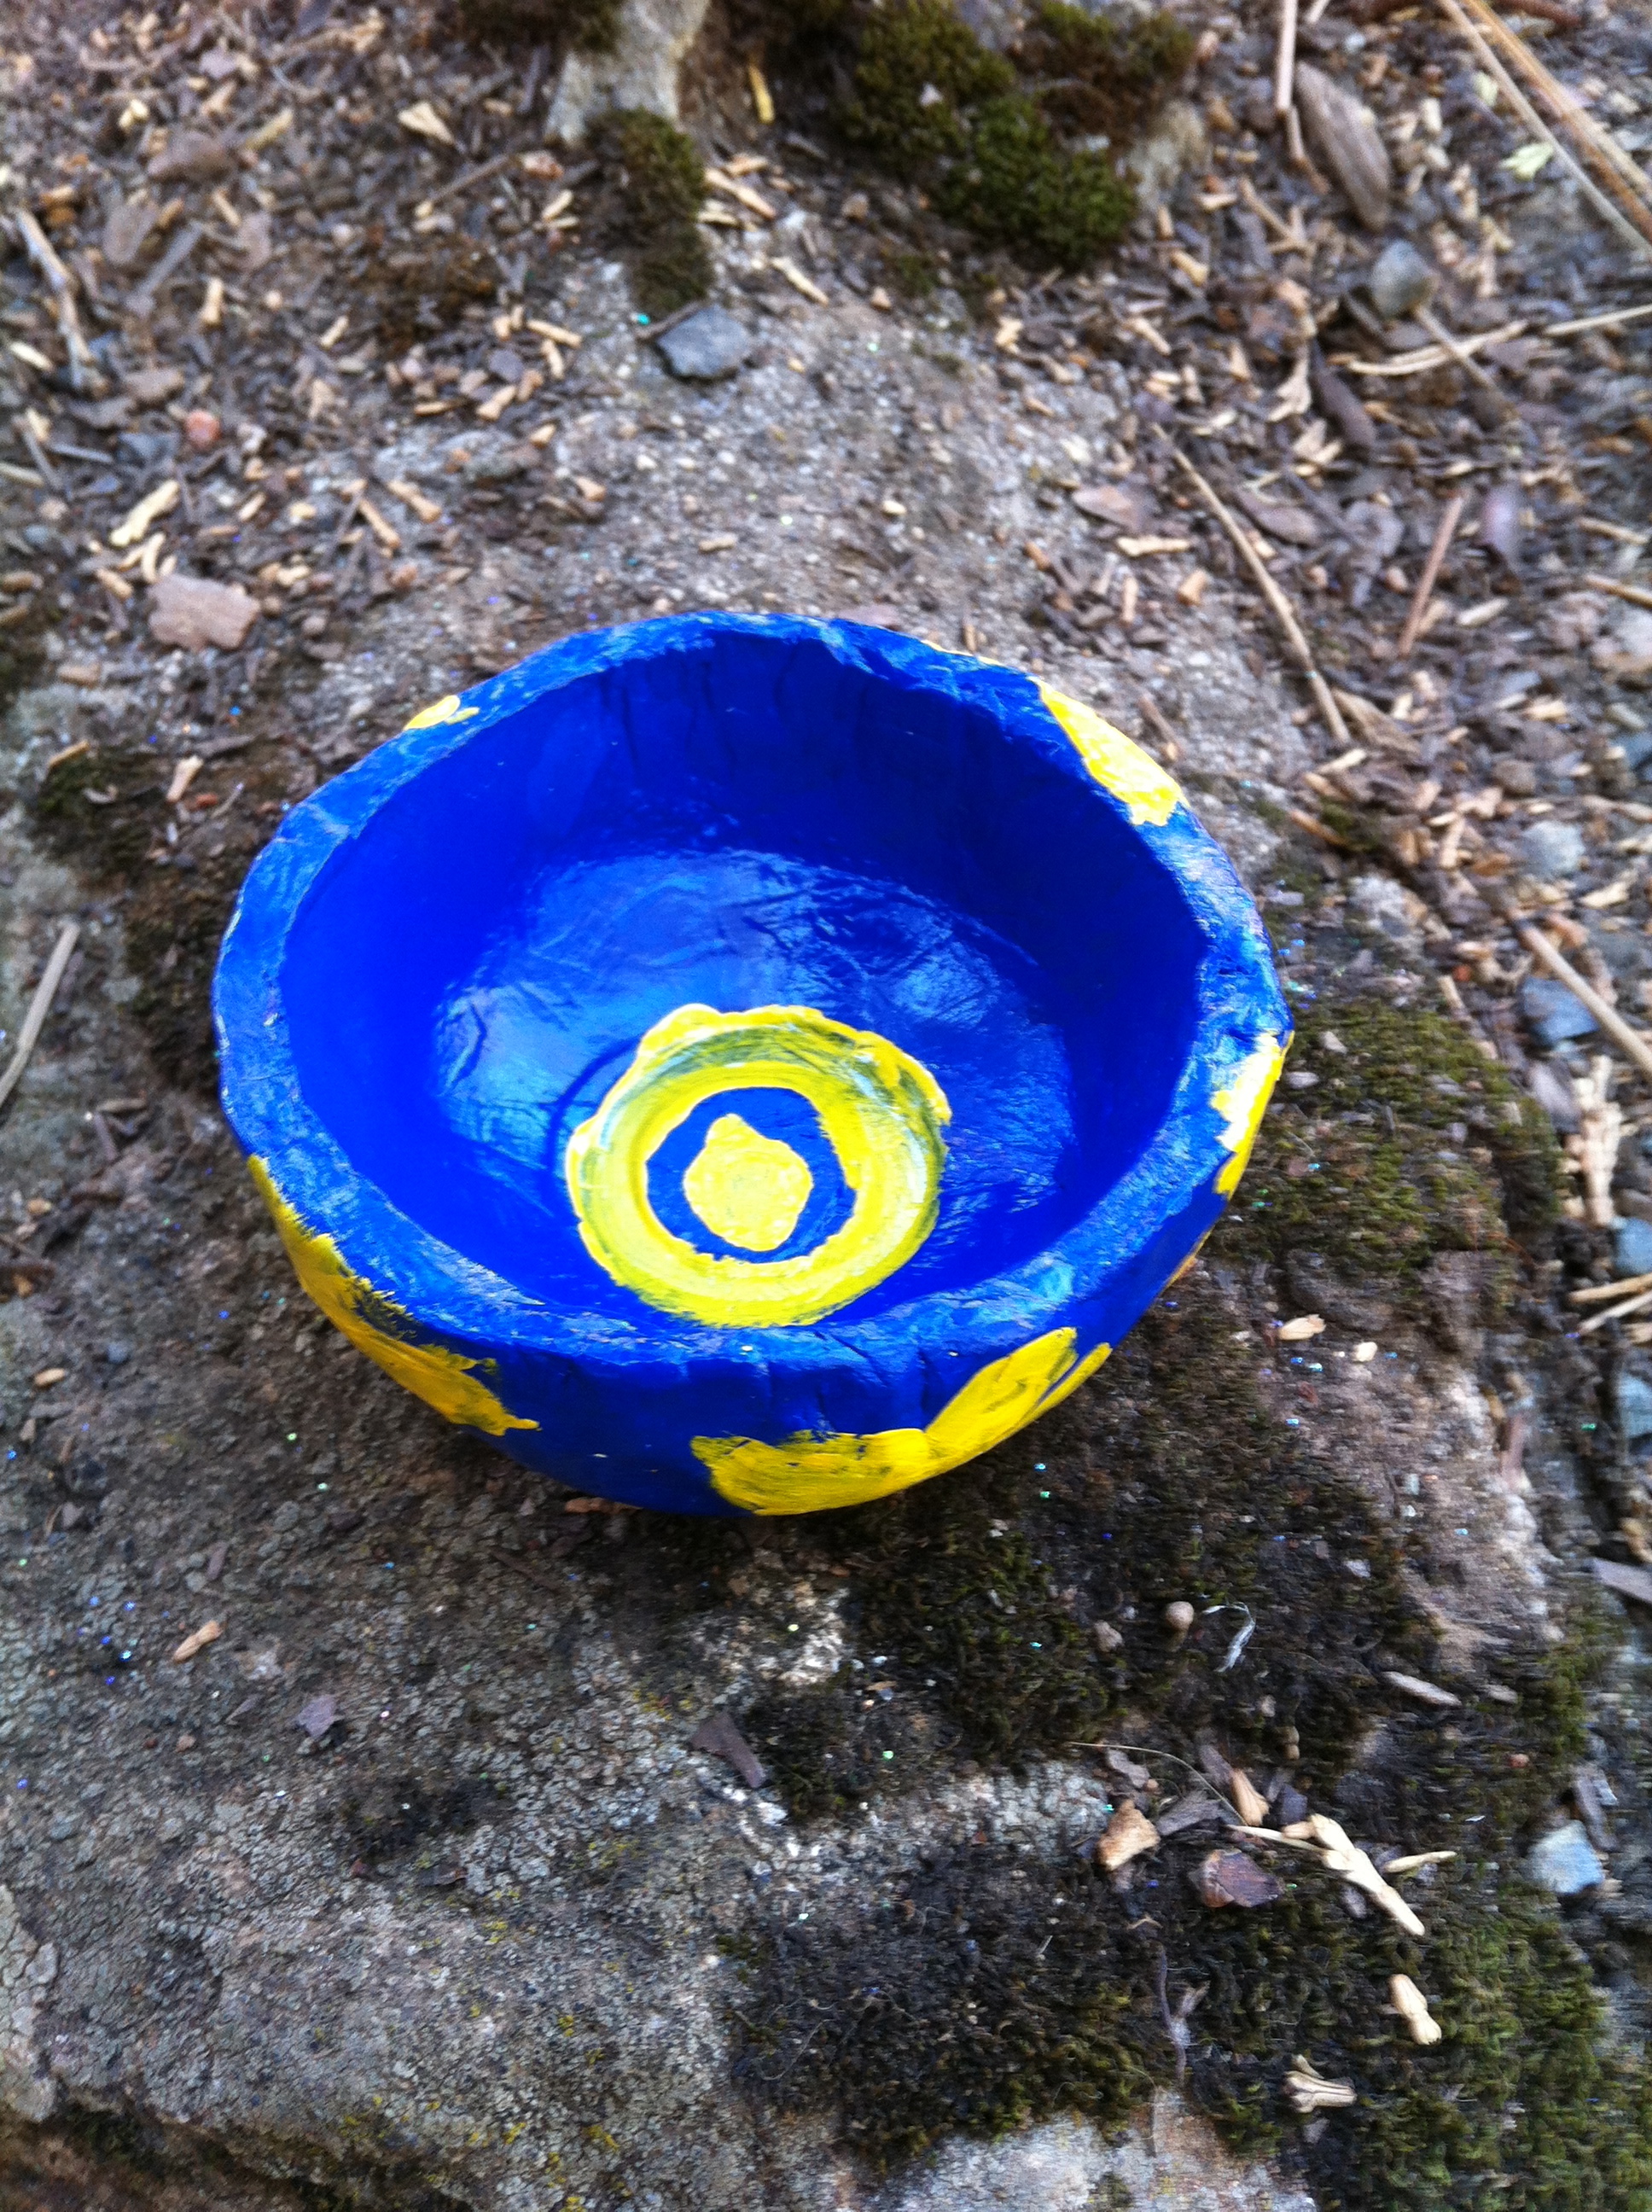
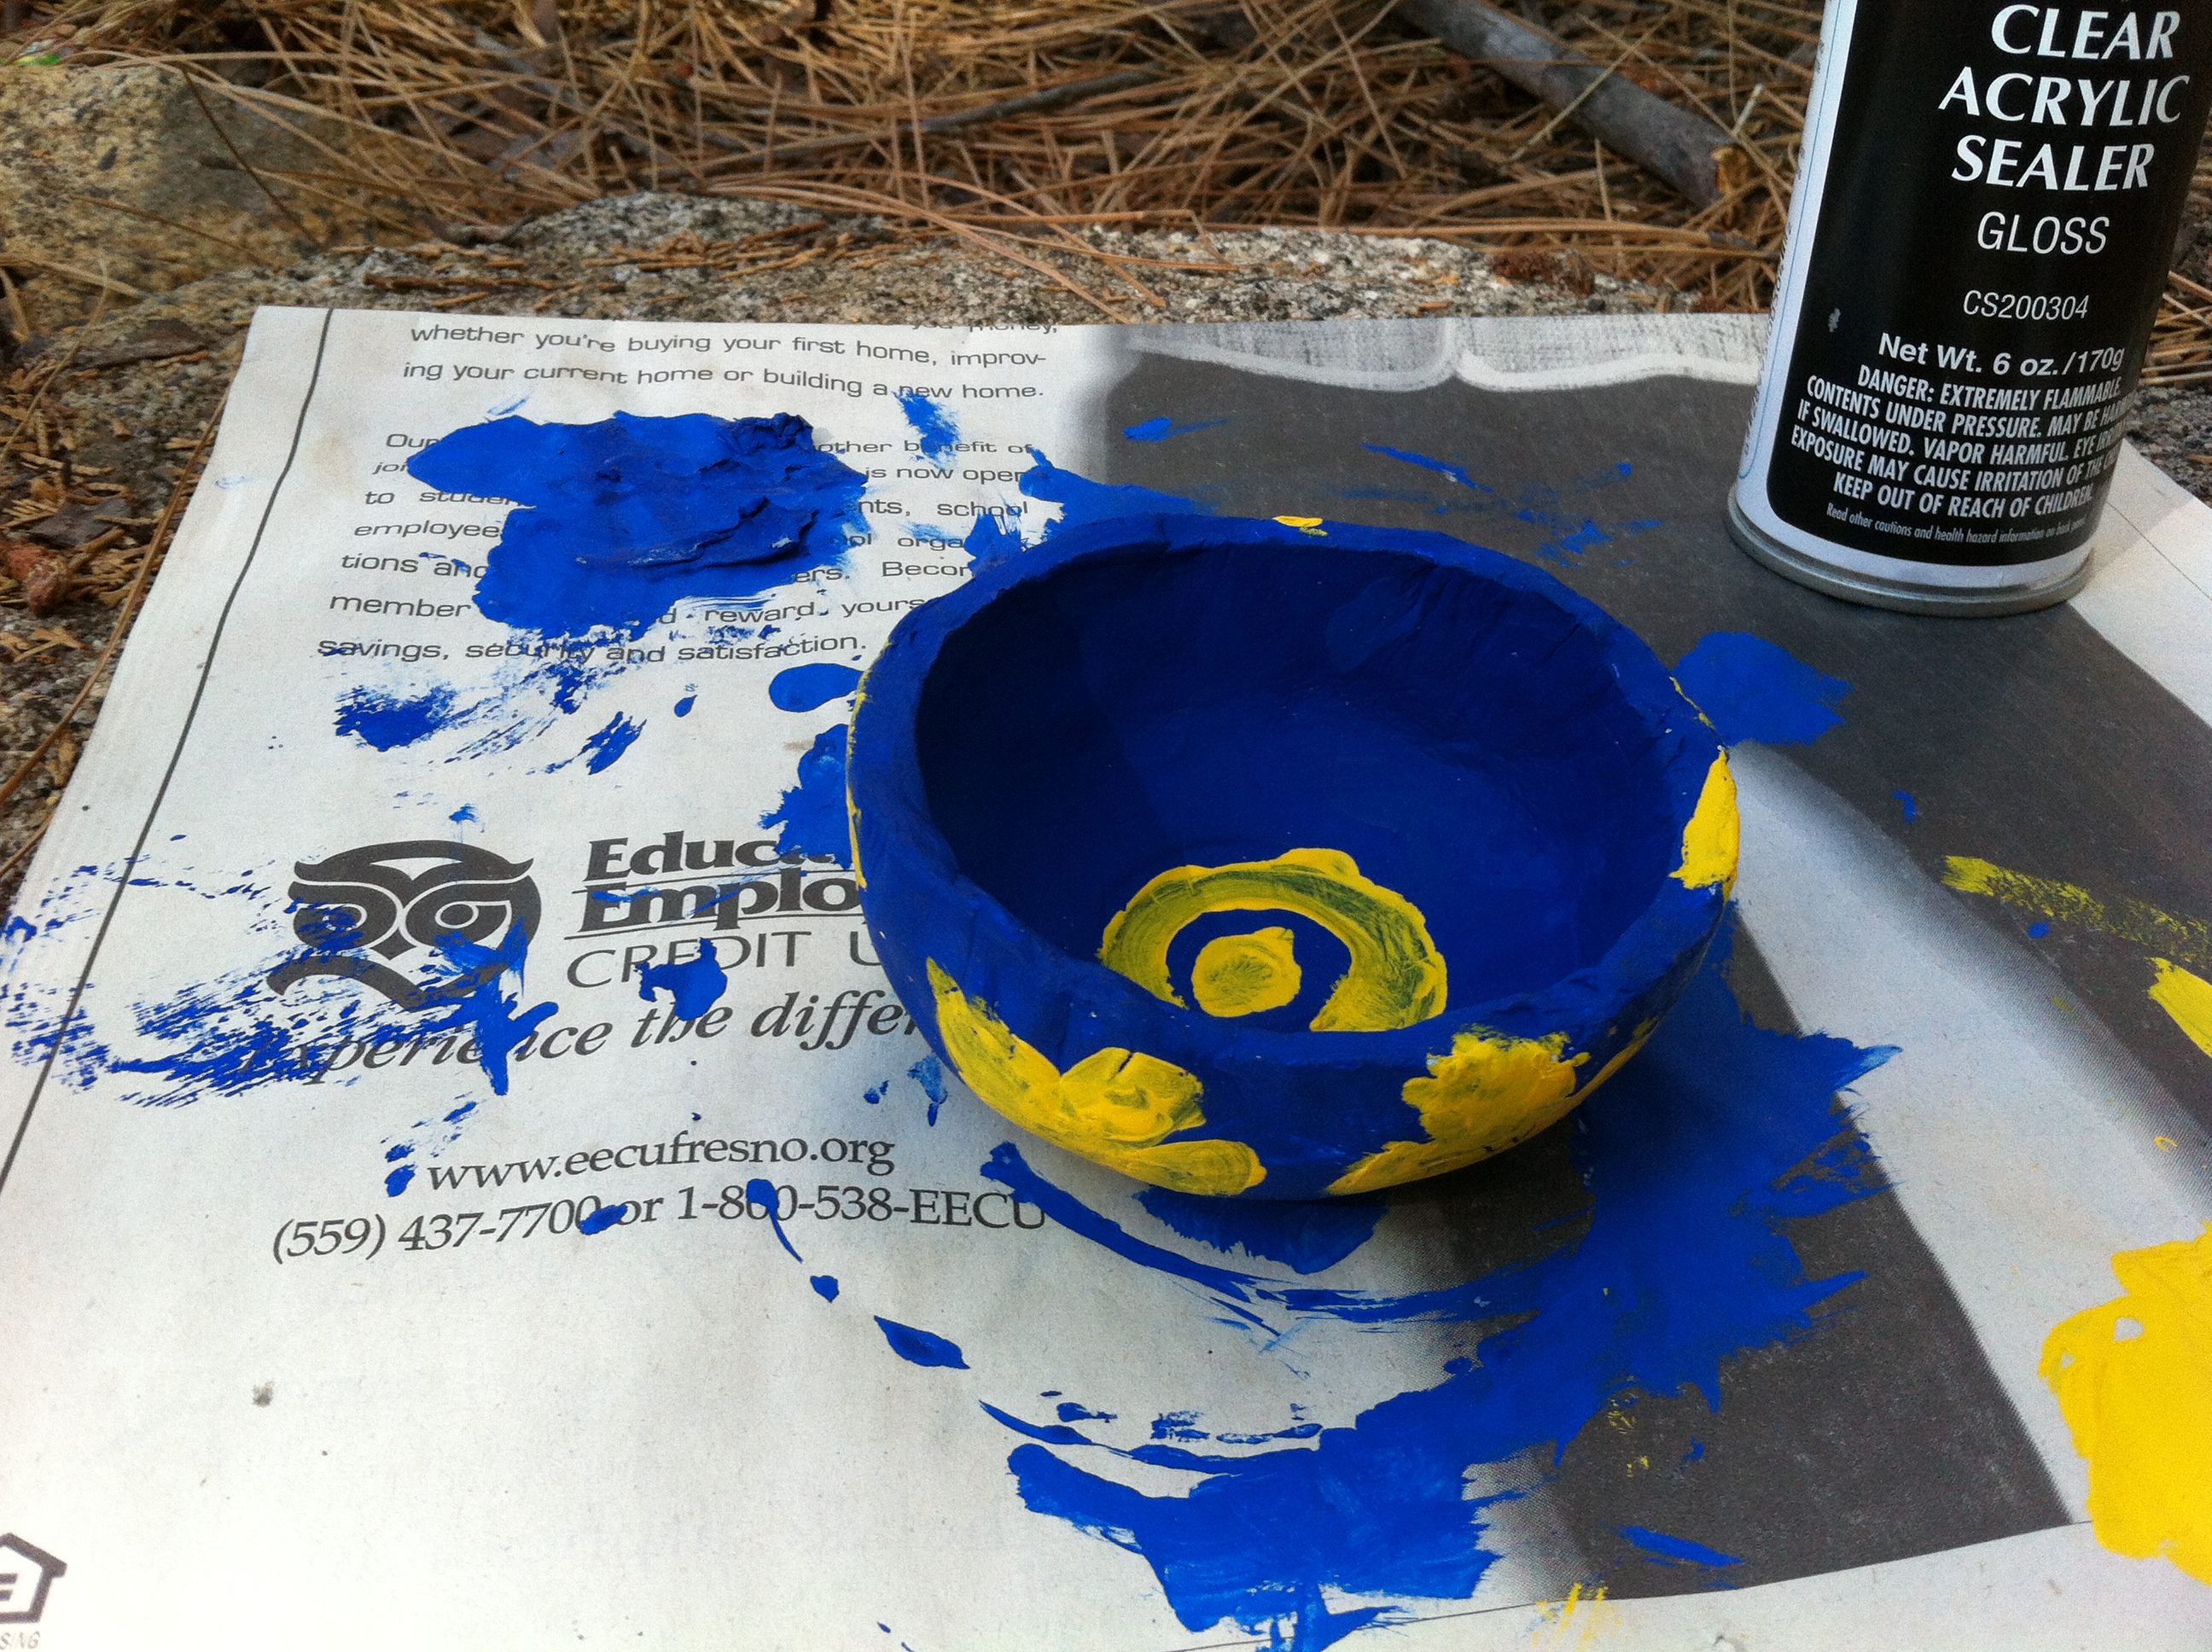
Meanwhile, the body of the jar had dried and was ready to paint! If the jar and lid are both going to be one solid color, you can wait to paint them both at the same time, but there are endless ways to paint and decorate the jar. Captain went for a solid-color “stone” look after painting the bottom of the jar a dark color and then changing her mind.

IMG_7212

Using acrylic paint, she mixed the desired colors…

IMG_7216

Painting the jackal head…. It looks so cool!!

IMG_7211

Painting the jar was fun. When she got bored with painting it the second time, Dad jumped in and helped too!

IMG_7262

After the jar is completely dry, screw the head right on! Fantastic! This is a terrific project and I want to thank the folks at DIA for sharing this wonderful method. Captain’s jackal-headed canopic jar has become a conversation piece at our home, and we all LOVE how it turned out and are very proud of her. This project stimulates so many things like creativity, history, culture, patience, imagination! We talked about Ancient Egypt a lot while working on this and throughout our other Egyptian projects, which will be coming up here on Kartwheels. I would like to add that any project that allows for mistakes to be made with solutions to be figured out is terrific for kids. When the jackal head and jar were outside drying, Captain tried to play with the head and snapped one of the almost-dry ears off of her jackal. She was devastated and cried that it was ruined and was ashamed of herself for trying to mess with it after we had advised that it not be touched until dry. It was a wonderful moment when I came out of the house with some Gorilla Glue and together we reattached it and also filled in a couple of small cracks.  Voila! It was a gentle reminder that most things can be fixed, and I got a giant hug too 🙂

Read more about Canopic jars of Ancient Egypt here and definitely google “canopic jar images” to see some fantastic examples of both ancient canopic jars, and handsome ones made by students and Egyptologists alike!

Visit Discovery Kids to try your hand at preparing a body for mummification online, courtesy of BBC.

Thanks so much for reading, and if you try this project with your kids, we would love to hear about it!

An ancient tomb of echoing cheers to all,

Karen

Categories: Art Rocks For Kids!, History Rocks For Kids!, Homeschooling Projects | Tags: , , , , , , , , , , , , , , | 10 Comments

DIY: Make a Rockin’ Backyard Tipi For Kids!

IMG_7298

Captain, or “Princess Akeezia” as she calls herself, may never stop playing in her $3 backyard tipi! 

IMG_7280

What you need:  5 or 6 heavy bamboo stakes (6 to 8 foot length), a heavy-duty rubber band, and something to cover the tipi (piece of fabric, burlap, or a sheet)

I cannot recommend tipi-making enough!  What a fun and inexpensive way to provide your child with endless hours of entertainment and play (not to mention being a hero for it!). We bought our 6′ heavy bamboo stakes at an orchard supply store for less than 50 cents apiece. We will be going back for some 8 foot pieces as well!  Simply gather them and secure at one end with a heavy-duty rubber band and, voila!, you’ve got the frame.  Wrap it in fabric (we used a brown sheet, but wouldn’t a piece of fabric that could be painted be fun?!) and that’s pretty much it. We set the tipi up inside and then promptly took it outside for obvious reasons. The bamboo stakes are weather-proof, and a tipi can easily be constructed and left outside all summer. They don’t take up much room, and can transform even a small space into a wonderful imaginative world.

** Note:  I tried to find the bamboo stakes at the local home stores but couldn’t find them long enough.  You may have to call around to orchard, or farm supply stores to find big enough stakes.

IMG_7281

Secure with rubber band

IMG_7290

Dad wrapping the outside of the shelter.  The tipi is STURDY!

IMG_7297

Princess Akeezia

IMG_7283

Trying to knock the tipi down but realizing it is quite sturdy 🙂

We would love to hear about family tipi-building here at Kartwheels!  We hope your summer is a beautiful one, and three cheers for all of the kids out there; their imaginations, their beautiful hearts and minds, and their need for FUN..

Cheers!  Karen

Categories: Family fun, Homeschooling Projects, Social Science Rocks For Kids! | Tags: , , , , , , , , , , , , , | 8 Comments

Create a free website or blog at WordPress.com.